Oil painting

As its name suggests, is a mixture of pigment pigments that form a more or less light paste and oil. This oil is drying like linseed oil, i.e. it hardens in contact with air and light, this is commonly called drying. It appeared at the end of the Middle Ages and was a great success in the time of the impressionists.
We use gasoline to dilute it, more precisely turpentine gasoline. The oils used are linseed or carnation oil. To have good results and thus succeed in your works and avoid cracks, you will have to respect certain rules to understand and master this technique.
One of the disadvantages of oil painting is its smell, due in particular to the use of gasoline, it is advisable to work in a well-ventilated area and it is good to have a place dedicated only to this activity. It is possible to use oil paint on a dry acrylic layer but not the other way around.
If you’ve been interested in this technique, you’ve probably heard about the lean-on-fat rule. The explanation is very logical and it is important to respect this rule to avoid cracks. This consists of superimposing the layers of paint that are becoming increasingly greasy, i.e. more oil-laden. Because the drying takes place in contact with air, the lower layer must not remain soft while the upper layer has hardened.
We often start a painting with a juice: painting very diluted with turpentine oil to lay the foundations, the sketch of your subject.

Traditional method
First of all, draw the main lines and contours of your motif on the support; either with a fine brush of a diluted colour, such as Sienna or ochre, or with a charcoal.
Then, the roughing is carried out in a single, highly diluted shade. This step places shadows and lights.
It’s time to move on to colour. Several coats can be applied but be careful! Make sure to respect the drying time of about 2 weeks between each coat so that it hardens correctly, as well as the rule of fat on lean. The new layer must always be greasier than the previous one.
Example (there are many variations): A first layer made of a mixture of colour + medium to be painted / a second layer made of a mixture of colour + Oil.
Then, once your paint has taken the time to harden again for 2 or 3 weeks, you can now apply the glaze. A glaze is the characteristic of oil painting and it is what gives it all the nobility and depth of its tones. What was once an essential part of the profession and today is little mastered and even little known by artists, even professionals.
News
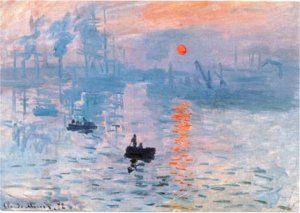
Impression, sunrise by Claude Monet: symbol of the impressionist movement
Impressionism is considered the first revolutionary art movement that echoed the abstract thinking that emerged years later. Considered the catalyst for modern art, it has played a central role in art history, its influence evident in a range of artistic practices....
The girl with a pearl by Johannes Vermeer
Young Girl with a Pearl, an oil painting on canvas (1665), is one of the best known works by Dutch artist Johannes Vermeer. It depicts an imaginary young woman in an exotic dress and a very large pearl earring. The work is kept in the Mauritshuis Museum in The Hague....
The Venice Film Festival returns this year with masks and rules of social distancing
The Venice International Film Festival announced Tuesday the programming of its 77th edition, taking precautions including temperature controls and outdoor screenings for what will be one of the first major international festivals held since the start of the...
A glaze is a transparent color that is superimposed on another, modifies its color without covering it. The typical example is a blue glaze on a yellow background that will give green. Only the intensity of this new hue will be much more beautiful and deep than a simple green color because the rays of light pass through all the layers to reflect on the deepest one. It’s like superimposing colored glasses on top of each other.
In short, the traditional technique of oil painting is exciting, bewitching but long and rigorous. But for those who are more in the spontaneous and who need speed of execution, there is the second method: L’alla prima!
Method alla prima
Tips: Start by painting the whole, the shapes and the main lines, then gradually paint the details. Take several brushes with you, this will avoid having to clean them each time the colour changes.
The drying process
If it is common to say that the paint goes through a drying phase, it must be said that in reality oil paint does not dry, it hardens. And it can take a certain amount of time, even a lot of time! This slowness has its advantages: there is time to mix colours, beautifully shaped, melted and graded, to correct mistakes and to work on certain details for several days.
In thin layers, it can take a few weeks, in normal or thick layers… several months or several years! To know that if the dough is really too thick or if the oil is not drying enough, then your painting will never dry out….
This phenomenon of drying a canvas that occurs after each brushstroke can be difficult to control, which is why it is advisable to start painting in a thin layer rather than a thick one. The surface will harden quite quickly, while in depth the paint will still be “soft”, so you will have to be careful with any movement or tension, because the crust on the surface will inevitably crack.
Brilliance

